Walkero
software engineer, Drupal follower, Docker ninja, JS explorer, PHP believer, exotic Hardware beta tester, Amiga enthusiast, truth seeker, parent & husband... at least for now...
When you mess with the Amiga computers, especially the original ones created by Commodore, you never stop having fun. To keep them working for a few decades more, there is a need to mess with their electronic components as well.
I wonder how young people would react, if someone told them that the last few days he was kept busy by changing capacitors at his computer. And that’s exactly what recapping is and I can tell you that it’s not easy to do. But as soon as you turn the computer on and see that it works just fine, without any issues, a feeling of greatness fills you from your head to your toes.
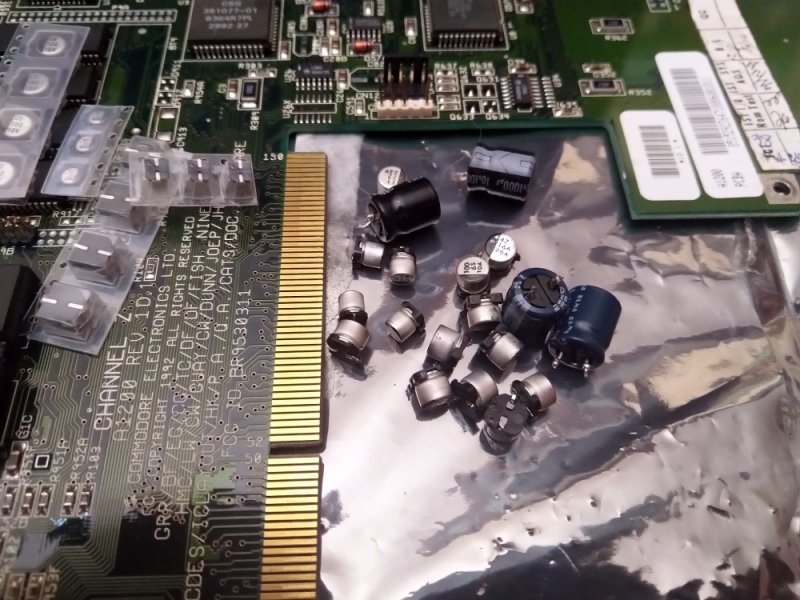
Recapping is the process to change the capacitors from an electronic device, mostly because after many years of use, they tend to spread fluids underneath them and breaking the motherboard traces and the close components. To prevent that you have to replace all the capacitors with new, good quality ones.
The last few days I decided to recap, not one, but two Amiga 1200 motherboards. I bought the first one a few years ago, as broken/non-working, and the second one is my main gaming Amiga, with a lot of games installed in the hard disk.
Recapping the broken motherboard
Let me start by telling you the story about the broken one. Basically, it was working, but it had serious issues with the sound, which had a lot of noise and the volume was really low. Also, it had a broken pin at the internal IDE interface, which needed to be replaced. I hoped that the sound problem might be resolved after the recapping, in case the cause was a faulty capacitor.
Well, I had to change 19 capacitors, where 15 of them are SMD and 4 through-hole. Have in mind that Amiga 1200 released back to 1992, so these capacitors are soldered for more than 27 years on this motherboard. And this was not an easy job to do. Thank God, most of the capacitor didn’t have a big problem after all these years, but two of them already started spreading some fluids. Everything cleaned and replaced.
One site that helped me to check the trace continuity, the position and the polarity of each capacitor is the Amiga PCB Explorer. It is a really useful website, that helps check the motherboard after any change you do, before you turn it on and blow everything.
The sound, unfortunately, was not resolved after the recapping, and I began to check the motherboard for trace continuity problems around the sound circuit. The motherboard schematics are necessary as well, and can easily be found at the Internet, which are a good source of information on how things work. Additionally, I was checking at various websites about people talking for similar problems like what I was experiencing. I managed to find a forum post at English Amiga Board, where someone had similar problem and shared some voltage metrics. I did exactly the same and I saw that we had pretty similar issues.
The problem was that the IC LF345, which is the sound amplifier, didn’t get the right amount of voltage, so it didn’t work right. One small cable helped me feed it with the right voltage and the sound was loud and crystal again.
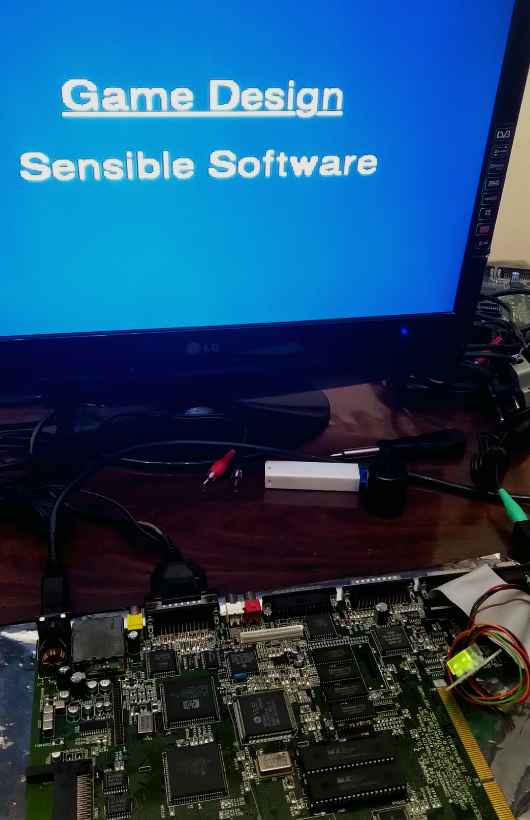
After the above I used the Amiga SysTest from keirf, which is a bootable disk with a lot of useful utilities to test your Amiga with. Tests like the sound output from different channels, the memory, the keyboard keys and many more. These utilities are really useful, but do not replace, in any way, the real life testing, by playing some games. So, Sensible Soccer and Cannon Fodder were the first games I tested on this Amiga. And everything worked just fine.
Since I was doing all these fixes at the motherboard, I wanted also to fix the clockport pins. All the Amiga 1200 have some pins where you can connect extra devices, like USB or Soundcards. This motherboard is a revision 1D1, and that means that the pins are soldered by Commodore at the wrong position. So I had to desolder them and add new pins at the right side. This was done and the motherboard has now a working clockport.
Recapping the main Amiga gaming machine
The second A1200 motherboard was working just fine, with no major issues. There were only some artefacts at the screen when I turned on the machine, which point to faulty capacitors.
While I was recapping it, one capacitor removed really easy, but it removed that underneath trace as well. It seemed that this capacitor broke that trace for good with it’s fluids. It was hard but I managed to find a way to solder the new capacitor to it’s place, with no broken continuity at the traces near it.
After a couple of hours I managed to have this motherboard recapped and ready to be tested, which of ‘course I did. The Amiga SysTest disk was again helpful for testing the sound and the memory of the machine.
Although the process of recapping your computer is not an easy one, a successful result brings joy and happiness. You should never try to do that if you are not experienced with soldering and desoldering electronic components, if you lack of knowledge about electronics and they work, if you are tired and if this computer is really valuable for you. There are professional people that can do the job for you, and you better contact them.
Now I have to make my own recapping stickers, where I can write down the recapping date, and stick them on the motherboard. In the future I need to order new caps for one more Amiga 1200 and an Amiga 600 I own. They need some love as well.